Wednesday, May 7, 2014

Tactical Pistol Course Day Three - Introduction to Practical Gun Fighting

Tactical Pistol Course day three - The morning starts with our Psychology of Violence lecture after which we transition to the range to start the introduction to practical gun fighting. During this pistol course, you will shoot at extreme distances, be introduced to angles and cover, develop target discrimination and multiple target engagement techniques, and start to shoot on the move.

Our world-class mentors will work closely with each client to ensure you have the feedback and information needed to truly master the skills you are paying to learn!


Pistol Course includes:

  • Psychology of Violence
  • Shooting at distance
  • Angles & cover
  • Target discrimination
  • Multiple targets
  • Shooting on the move
  • Access to the Graduate Practice Library

Course Fee: $275.00

You will need 225 rounds of factory-produced ammunition.

You are welcome to fire any firearm in our inventory if you rent a firearm for the pistol course. Rental fee includes equipment and ammunition; $150.00

Prerequisite: Tactical Pistol Course two or pass the skill check on arrival at the range.

Sign up now on our monthly calendar and on our list of scheduled Day Three Pistol Courses!

Stay at the AAA Four Diamond rated Pala Resort and Casino at the Aegis Academy Group rate while you are taking our courses!

Source : http://aegisacademy.com/tactical-pistol-classes/pistol-course-3

Monday, May 5, 2014

Risk Analysis and Mitigation from a Travel Security Perspective

Travel Security - Risk Analysis & Mitigation
The most common and unfortunate state of mind people adopt is that protection is the responsibility of someone else. You can personally exert an extraordinary amount of influence over your own safety and security by controlling your actions. Adopting the mindset that your personal safety and security is up to you is the first step in improving your chances. The next step is learning how to evaluate risk, and implement actions and controls to maintain and advantage in any environment. The first step is analyzing risk.

Finding the “right” risk metrics


In the evaluation of risk, the first and most critical step is to choosing a quality data set. The greatest gift the Internet has given us is a vast supply of information on demand. Unfortunately, much of it consists of un-researched opinion, or worse pure fabrication. When evaluating personal security risk, you have to select, vetted, relevant and appropriate sources of information or you will undoubtedly end up protecting your self against the wrong threats. The Department of State, CIA World Fact Book, UN Office on Drugs on Crime, World Health Organization and the Economic Intelligence unit are great places to start. Alternatively, there a number of professional reports that you can purchase on any city or area to which you may want to travel. Basing risk decisions on what you are fed by the media, Hollywood or that scholarly journal Wikipedia is unlikely to result in productive and useful plans to mitigate that risk!

This should not simply be a physical risk evaluation and it should include risks that could impact the success of your reason for travelling. You are choosing to expose your self to risk for a purpose, and if you don’t accomplish that purpose, you should choose not to take the risk in the first place. If you are travelling to Sierra Leone to import natural resources, anything that will prevent you from obtaining or importing resources is a risk. If you do not account for those risks, you may have a physically safe trip that results in you very adeptly undertaking a risky evolution for no productive reason. Culture, infrastructure, opportunity and preparation all play into it.

Risk Analysis


Once you have selected appropriate sources of information, you are ready to start dealing with the process of determining what to do with it. Analysis is simply a process of systematic evaluation of information. Ultimately, the real goal is to develop a consistent approach to evaluating the information you collect. The first step is to make a determination of what is likely to happen. This is a fairly exhaustive list of what may happen. It consists of the things that are likely to impact traveller to that country and have almost nothing to do with your personal ability, plans or circumstances.

Then next step is to look at the catastrophic impacts that could occur (Death, Permanent Injury, Loss of the deal, etc…). Remember, base these on your data set, not on your personal circumstances at this point. I then combine theses two lists into a set of potential occurrences. Here is the most important step in the process. Cross anything off the list that is completely beyond your control, leaving only the things that you can influence. If someone else with more money, more physical ability, or language skills you do not posses could influence those factors that is irrelevant to your risk evaluation. If you don’t have the skills, money or time to influence the potential occurrences, don’t spend time trying. We want a comprehensive list of things that are likely to occur in the area to which we are travelling.

We can now start to assign a probability and severity rankings to the list. A cold is pretty likely, but pretty low on the severity list. Being murdered is probably a low probability side, but at the top of the severity list. I rank severity in the same manner as we rank the scale of injury. 0 is no impact or no injury. 1 is minor injury with little to long-term impact. 2 are serious but recoverable injury, or serious but recoverable impact. 3 are permanent injures, or permanent unrecoverable impacts. 4 are death or catastrophic impacts. This is a somewhat arbitrary scale in that you simply have to lump it in to one of four categories.

Next we look at the probability of occurrence. Once again we place them into one of five buckets labeled A – E. E is improbable, or a freak occurrence. D is unlikely, or something that may happen once in a blue moon. C is moderate, meaning it might happen. B is likely, or something that will more likely happen then not. A is something that you would be pleasantly surprised if it did not occur.

In evaluating our list, we can now cross off everything we have labeled as a 0 or E. If the impact is 0, we are not going to waste time trying to mitigate the risk. If the probability is so low that it falls into the freak occurrence category, we will not spend time trying to reduce it even further. These is the list of things that are likely to happen, and against which we are going to apply time effort and resources to minimizing the impact or the probability that they will occur.

Minimize Probability Risk


The first thing I want to focus on is minimizing the probability. Not having an event occur is always preferable to minimizing the damage it may cause. We can minimize probability by our actions. There is an extensive list of these skills and good habits written out in Preventative Defense. Examples are locking your car doors, inspecting the tires on your rental vehicles, avoiding bad neighborhoods and making a conscious effort to blend in. Anything you can do to minimize the probability is an action.

Minimizing Severity Risk


The next step is focused on minimizing the impact of negative events if our attempts to avoid them fail. Examples are things like wearing a seat belt, carrying some simple trauma management equipment, and learning to ask for help in the local language. Anything you can do to reduce the severity or impact of the event called a control.

Mitigating Risk


As I look at my list of things that are likely to happen, I write our actions and controls that will influence the probability or severity of the event. Every action and control (or risk mitigation tactic) has a cost and an effort level associated with it. The key to actions and controls is that they have to be affordable. If you develop a phenomenal plan to mitigate risk to nearly zero, but it costs a trillion dollars to implement, you may as well rely on a wish from a magic genie. They have to be practical. If you plan is so detailed that it requires 16 hours of your day to execute, you have no time left to accomplish your goal so you may as well not go. Lastly, you have to come up with actions and controls that you will actually do!

After I have listed my actions and controls, I evaluate my list of potential occurrences again and assign a new probability and severity based on the implementation of my actions and controls. Ideally, we are able to reduce both, but the reality is that we are far more adept at developing controls then we are at reducing probability so do not fall into the trap of reducing a probability rating based on a good control. In other words, wearing a bulletproof vest is great control if you are dealing with a risk of being shot. Putting on the vest does not reduce the probability of being shot by one bit.
I now look at my risk matrix again. I am looking for things that fall in likely or catastrophic category. Ideally there is nothing on the list that falls into the 1A category after our actions and controls have been implemented. If there is, then you need to apply more resources to mitigation (Usually money and time), or you need to reevaluate the purpose of your trip.

If we have developed effective actions and controls, things with a severity rating of A should have low probabilities and things with high probabilities should have low severity rating. If we have anything left on our list that does not fit that profile, we need to reconsider our actions and controls to determine is something more can be done.

Putting risk analysis and mitigation plans in action


Some risks are inherent in our work and our lives, and we have to accept them in order to be effective. The concept that we can or should mitigate risk to zero is costly, inefficient and ultimately impractical. Since there are some risks that I must accept, those with moderate or likely occurrence ratings and moderate or severe consequences will result in the development of an emergency action plan. The emergency action plan will be discussed in the next article, but it consist of identifying threat indicators and appropriate responses to break the cycle of violence or injury before it impacts us.

This can at first be an exhaustive process, however, a little practice goes a long ways. The more you do it, the more it becomes second nature. The key piece is to find actions and controls that are practical, executable and that you make the time and effort to actually do. Writing a plan that keeps you away from the local opium den is great, actually staying away from the opium den is what makes you safer.

Plan, Travel Safer and have more fun!

First Published at Aegis Academy

About Author


- Patrick Henry


President


Patrick Henry
Patrick Henry received his operational training and experience from the U. S. Government, 22 years of which were spent in the Marine Corps where he served in the Reconnaissance, Infantry and Intelligence fields. During his active service, he spent more then seven years deployed overseas in combat, operational and training assignments. After the military, Pat worked as a contractor and as the Director of Operations at a private paramilitary company, specializing in training special operations forces and providing protective services to select private clients. His education consists of an MBA from the University of Southern California (USC), and a BS from San Diego State University with an emphasis in Biochemistry, Cell and Molecular Biology and a minor in Psychology. He holds an extensive list of security and training related certifications from a variety of government and nationally recognized entities. He currently sits on the advisory committee at USC’s Master of Veterans Business Program, and is an active member of Infraguard and the American Society of Industrial Security (ASIS). He has been a guest speaker at ASIS, the San Diego Industrial Security Awareness Council and other private organizations on physical security, travel security, and competitive intelligence collection counter-measures.

Sunday, May 4, 2014

Tactical Handgun Training Day Two to Improve Speed and Accuracy

Welcome to Aegis Academy’s handgun training day two! The morning starts with our physiology, ballistics and legal considerations lecture. Afterward, we transition to the range and work efficient manipulation starting with presentation, and through malfunction and reloading. This handgun training course will give you the tools you need to become efficient and precise with your manipulation. That efficiency and consistency is what eventually translates to speed and accuracy.


Each course comes with access to our online library of handgun training drills. The library contains a professionally programmed series of drills with written instructions and video support designed to reinforce what you learned in the course. Our world-class mentors are available to you after the course via the training log for feedback and to answer questions. We look forward to working closely with each of you to ensure you have the feedback and information needed to truly master the skills you are paying to learn! See the video >>

Handgun Training Course includes:

  • Physiology of shooting
  • Introduction to Ballistics
  • Reloading
  • Malfunctions
  • Multiple shot engagements
  • Access to the Graduate Practice Library

Course Fee: $275.00


You will need 250 rounds of factory-produced ammunition.

You are welcome to fire any pistol in our inventory if you rent from us for the day. Rental fee includes equipment and ammunition; $150.00

Prerequisite: Pistol 1 or pass the skill check on arrival at the range.

Sign up now on our monthly calendar and on our list of scheduled Handgun Training Day Two courses!

Source : http://aegisacademy.com/tactical-pistol-classes/pistol-class-2

Friday, May 2, 2014

Tactical Pistol Training Day One is all About Mastering Trigger Control

Welcome to Aegis Academy’s Pistol Training day one! Pistol Training One is all about mastering trigger control. The program is based of much of Larry Mudget’s pioneering work on trigger control, which was developed at the Los Angeles Police Department in the Mid 1990′s. Most people who can’t hold a decent shot group never got this down and we can fix or teach it in one day. Once you get this part, you can progress to whatever level of proficiency you choose to achieve!

Tactical Pistol Training Day One
The morning starts with our training fundamentals and conditioning lecture. From there, we transition to the range to start the process of building effective tactical pistol training habits. We end the day with an optional maintenance class to ensure you understand how to disassemble, clean, test and maintain your pistol. You leave the class with online access to a follow on program with scheduled pistol drills which include video support and written instructions. You can log your practice and get feedback from one of the instructors if you have questions or concerns. Our world-class mentors will work closely with each client to ensure you are completely satisfied with your pistol training. We will make sure you have the concepts, information, skills and support needed to truly master the fundamentals! See the video

Pistol Training Day One includes:

  • Pistol Training Fundamentals
  • Conditioning Effective Pistol skills
  • Range Procedures
  • Loading & Unloading
  • Presentation
  • Trigger Control
  • Disassembly, Cleaning & Maintenance
  • Access to the Graduate Practice Library

Course Fee: $250.00

You will need 125 rounds of factory-produced ammunition.

Rental firearms are available, Sig Sauer, Glock, Baretta, Smith & Wesson, H&K, and more. If you rent a pistol from us, you can shoot any gun in the box, all day long! We will ensure you find a pistol that fits your needs before you leave for the day!

There is no prerequisite for this course.

Coming in from out of town:

Stay at the AAA Four Diamond rated Pala Resort and Casino at the Aegis Academy Group rate while you are taking our courses! The group sales link, login and password are included in your registration confirmation e-mail, but for planning purposes you can expect to save 12 – 15% off the rack rates!

Source : http://aegisacademy.com/tactical-pistol-classes/pistol-course-1

Monday, April 28, 2014

Internal Ballistics Part III – Ammunition Characteristics and Safety

Internal Ballistics - Ammunition Characteristics and Safety
Thank you for your continued interest in the study of ballistics. So far, we’ve covered the broad framework of firearm ballistics followed by two in-depth discussions regarding internal ballistics (firearm function and mechanical precision). In this article, I will conclude our discussion on internal ballistics by focusing on ammunition characteristics and safety.

In contrast to firearm function, which focused on the mechanical interaction of individual firearm components, understanding ammunition requires a focus on the thermodynamic conversion of chemical potential energy into kinetic energy. At the center of this energy conversion is the important concept of pressure. Rapidly expanding gasses create the pressure required to expand the cartridge case against the inside of the chamber, propel the projectile forward, and cycle semi-automatic weapons.

blowupAttaining consistent and safe pressure is the key to precision and reliable firearm function. Too little pressure causes firearm malfunctions and reduces both precision and terminal ballistic performance (bullet expansion, etc). Too much pressure can cause injury to the shooter and damage the firearm.
In addition to precision and function, three very important ammunition concepts relate directly to safety: the misfire, the hang-fire, and the squib-load. A misfire occurs when the firing pin properly strikes the primer, but the propellant does not ignite. A hang-fire occurs when there is a perceptible delay between the firing pin striking the primer and propellant ignition. A squib-load occurs when the firing pin strikes the primer and the propellant ignites but produces insufficient pressure to expel the projectile from the bore. These will be explained in greater detail below.

In order to fully understand how energy conversion, gas expansion, and pressure interact to fire a projectile, let’s take a detailed look at ammunition components.

Ammunition Components


Diag Bullet CutoutNomenclature: while often referred to by many different names (ammo, bullets, shells, etc.), ammunition is technically an enclosed system of components (case, primer, propellant, and projectile). For clarity, I will refer to the system of components as a cartridge.
Case: In general terms, the case holds all of the components together. Rifle and pistol cases can be made from brass (gold color), aluminum (gray), or steel/nickel (silver). Four main parts of a case are the primer pocket, rim, wall, and mouth. The open volume inside of the case determines the maximum amount of propellant the cartridge can hold. G 21 Case 2 Function – as the propellant ignites and produces rapid gas expansion, pressure forces the case walls and mouth outward to form a tight seal against the inside of the chamber. Forming this tight seal is important for two reasons: (1) it directs remaining pressure forward to efficiently propel the projectile; and (2) it facilitates the rearward momentum required to cycle most semi-automatic firearms. Loss of pressure due to cracked or malformed cases can cause firearm malfunction or injury. What You Should Know – All shooters should routinely check a portion of their spent cases for signs of overpressure (cracks, bulges, elongation, etc.). Spent shell cases that show signs of overpressure indicate a possible firearm malfunction.

Primer - Firearm MalfunctionPrimer: The modern percussion primer consists of a small metal cup that contains a pellet of sensitive explosive material secured by a paper disk and a brass anvil. A strike from the firing pin on the center of the cap compresses the primer composition between the cap and the anvil. This causes the composition to ignite. Holes or vents in the anvil or closure cup allow the flame to pass through the flash hole in the cartridge case and ignite the propellant. Primers are constructed to be rugged enough to prevent unintentional detonation while retaining malleability to assure consistent ignition. Function – the primer plays a major role in the ignition sequence. Conversely, it can either be the source of or the key to diagnosing firearm malfunction. What You Should Know – (1) when firearms and cartridges are functioning properly, routine inspection of spent cases should indicate uniform firing pin indentations in the center of the primer. The same routine inspections can also identify excessive pressure (primer flow – the primer is literally either pushed out of the primer pocket or is spread along the base of the cartridge). Primer 2(2) in the event of a misfire (no primer ignition), inspect the primer to determine if the firing pin either struck the primer off-center (improper headspace or extractor tension), did not strike the primer with enough force, i.e. a “light strike” (could indicate a dirty firing pin channel, broken firing pin, or improper headspace), or the cartridge malfunctioned (primer set too deep in the pocket or the primer itself is bad). In the latter case, if the problem persists among multiple cartridges, attempt to fire a different brand of ammunition through the same firearm to determine if it is an ammunition malfunction or firearm malfunction. If it is the ammunition, sequester the remainder of the box, note the lot-number, and contact the manufacturer. (3) hang-fires and squib loads are not normally attributable to primers.

Propellant - GunpowderPropellant: more commonly known as “gunpowder,” propellant has come a long way since its first use in firearms in the early 1200s. Most modern propellants are double-based nitrocellulose compounds produced in a variety of physical dimensions (densities and shapes). These densities and shapes determine how quickly the propellant burns. Function: Three components are need for combustion: kindling temperature, combustible material, and oxygen. In conjunction with the primer’s flame, propellant contains all three. Through thermodynamic conversion, the mass of the propellant is changed into heat energy. During deflagration (rapid burn), heat energy is converted into massive gas expansion which creates the required pressure to complete the sequence. What You Should Know – (1) in the event of a hang-fire, keep the weapon pointed in a safe direction for at least 30 seconds before opening the action to remove the cartridge. It is difficult to determine exactly what causes a hang-fire, but the most likely causes are propellants that have degraded due to age or exposure to moisture (water, gun oil, etc). Propellant 2 (2) in the event of a squib-load, you will most likely hear an audible “pop” but not feel the full recoil of weapon. In most cases, the cartridge was loaded with either insufficient or no propellant at all. Initial pressure may expel the projectile from the cartridge case but leave it lodged in the barrel. Therefore, if you detect a squib-load while firing… stop firing immediately! With a projectile lodged in the barrel, firing the next round would create a dangerous overpressure in the firearm that could cause serious injury and damage major components of the firearm.

Projectile: Projectile construction, shape, and weight are most applicable to discussions on external and terminal ballistics, which I’ll cover in the next two articles. For internal ballistics, however, projectile shape and weight contribute to both mechanical precision and “impulse” or felt recoil. Function: Robert Rinker, in his book “Understanding Firearm Ballistics,” lists the following conclusions in regard to projectile characteristics and mechanical precision: (1) the longer the projectile in proportion to its diameter (caliber) the more barrel twist is needed to stabilize it; (2) A very long nose projectile is good for drag reduction and aerodynamic efficiency, but is harder to stabilize; (3) A longer and heavier projectile can be stabilized at the same rifle twist by increasing velocity; (4) A slower projectile requires a faster rifle twist to stabilize it. In regard to impulse or recoil, it is a basic physics principle that it takes a greater force to move a heavier projectile from zero velocity to initial velocity than it does a lighter projectile. Therefore, firing a heavier projectile will result in a greater impulse/recoil. Setback 9mm What You Should Know: In most metallic cartridges, the projectile is held in place within the mouth of the case simply by friction. This friction is created by applying a light crimp on the outer edge of the case mouth. In some instances, the act of feeding (stripping the cartridge from the magazine) and chambering (pushing the cartridge into the chamber) can cause “projectile set-back. Although rare, this is caused by the projectile tip contacting the feed ramp on its way into the chamber. For shooters who load and fire cartridges in the same action, this is less of a concern. For personal defense cartridges, however, the same cartridges can be chambered and unloaded numerous times before being fired, and thus the same projectile contacts the feed ramp on numerous occasions. In the event the projectile is literally “pushed into” the cartridge case, the volume within the case is reduced and the potential for overpressure is increased. In rare circumstances, this overpressure can cause injury to the shooter or damage to the firearm. If you chamber and unload your personal defense ammunition multiple times, please conduct a visual inspection to ensure that you are not “setting-back” the projectiles.

Putting it All Together


Undoubtedly, your intended use (target practice, competition, hunting, self-defense) will ultimately determine which cartridge you purchase. However, understanding cartridge characteristics and functions as they relate to internal ballistics and pressure can help you become a better and safer shooter.
Next month, we will cover external ballistics and the factors that affect a projectile’s flight to your intended target. Until then, stay safe and shoot straight!

First Published at Aegis Academy

About Author


- Howard Hall


Range Master


Howard Hall
Howard has served for nearly 20 years in the Marine Corps. He has served as a Platoon Commander, Company Commander, Battalion Executive Officer, Regimental Operations Officer, and Battalion Commander. He has multiple combat tours to include serving as a military transition team member in Fallujah. He is an NRA Certified handgun instructor and holds numerous Marine Corps training credentials. An active competitor in action pistol (United States Practical Shooting Association), long range rifle (NRA F-Class), and shotgun (Amateur Trapshooting Association, National Skeet Shooting Association), howard has earned numerous accolades and medaled during DoD competitions with the 1911 platform in bulls-eye shooting.

Tuesday, April 22, 2014

The Anatomy of a Kidnapping

Kidnapping - Personal Security TrainingThe number of attacks have massively increased worldwide. Terrorists, cartels and both organized and common criminals are adding kidnapping to their repertoire.

Some of this increase in volume represents an increase in traditional kidnappings. Some of it is due to the fact that muggers and robbers are getting smarter and using leverage as a tool, vice exclusively relying on fear and/or brute force. This has resulted in the adoption of the new class of robbery/extortion/theft, which has been termed “express kidnapping”. This is a short term, comparatively low demand, ransom is executed generally in 12 – 36 hours. Ransoms are usually what a person has in a checking or savings account that can be withdrawn via ATM or from a local bank.

Regardless of the type of kidnapping, it follows a process, just like every other cycle in nature. It is a five-step process, and the good news is you can influence each of these steps to some extent. The process can be broken down in to five phases. The first is the tactical phase during which the goal of the attackers is preliminary physical control. The transport phase is simply moving the victim to a location of advantage to the attackers. The intake phase is typically associated with physical abuse, with the goal being emotional control of the victim. The detention phase creates the possibility to reduce the number of resources required to physically control a victim. Finally, the exploitation phase consists of photos or videos with the goal of increasing a ransom incentive.

The tactical phase of a kidnapping:


The first phase of a kidnapping is the tactical phase. This is when the weapons are out, and you are being placed into a position the attacker controls. This is by far the most dangerous portion of the attack – but it is also your most likely chance of escape. Balancing the risk of injury with the risk of escape is a significantly challenging thing to do and it is critical that you are not coming up with a half-baked plan on the fly. Your priority is to survive, and your secondary goal is to escape. Don’t lose track of the priority based on a sense of bravado, entitlement or arrogance.

The confusion involved in tactical operations is difficult to manage for experienced military professionals. They have the luxury of conducting extensive rehearsals and training for a wide variety of contingencies prior to conducting attacks. The criminals attacking you do not have that freedom of movement to rehearse to nearly that level of fluidity or comfort. They are likely nervous, as they are committing a major crime, and you have to assume they will do anything to avoid arrest or capture. The goal of a kidnapping is to capture you alive, but never assume they value your life at this phase of the operation as much as they value their freedom. Remember – the goal of the tactical phase is to survive first, escape second.

You may be able to leverage the confusion, and competing interests vying for your attackers attention. If you blend into a crowd, disappear around a corner or slip away in the confusion, you have ended your role in the attack. While that would be an ideal outcome, you cannot ignore the real risk you are taking when deliberately not complying with your attackers instructions. If you get shot or stabbed in the process, you have significantly increased your risk of permanent injury or death. Only you can accurately balance your chances of success with the risk of injury based on your physical abilities and any available opportunities.


The transportation phase of a kidnapping:


The next phase of a kidnapping is the transportation phase. While your chances of injury are lower, this is still a very risky time for your attackers. They have committed a crime, and do not yet have complete control over your person. You may find yourself in the trunk of a vehicle, in the back seat with a hood over your head, or driving the car with weapons used to secure your compliance. Your chances of inadvertent injury at the hands of your attackers is less, but not negligible.

Conversely, you now have some additional barriers between you and escape. You may be bound, unable to see or locked up in a container. While your chances of escape are less than during the tactical phase, you are far from helpless. If you can open the trunk or container and get out at low speeds, you may well end the situation. If you are driving, you still exert an enormous amount of control. Your attackers are also still managing a tactical scenario as well and trying to maintain control of you. This is likely to be the last good chance of escape you will have, but if you are shot or stabbed in the process, you have made your situation worse.

The intake phase of a kidnapping:


The transportation phase ends at the arrival to what will be your detention location. We call this the intake phase. Depending on the number of links and the distance you will have to travel, you may alternate between transportation and intake at a number of short term holding facilities. The intake phase is likely to consist of your attackers demonstrating to you that you are under their control – or more accurately ensuring that you demonstrate to them that you understand you are under their control. The duration of this phase is largely in your control.

The sooner you can convince your captors that you are a compliant victim, the sooner you will stop being abused and be placed in a detention facility of some sort. There is no reason to go into detention more injured than necessary. The tough guy attitude will get you broken or killed and this is not the time for bravado. You are in a location they have selected, and most likely, even if you were to escape at this point, you will not have access to support from the local population. Unless you know where you are and have a good chance of attracting support, now is not the time for escape.

The detention phase of a kidnapping:


Long-term detention will take a psychological toll on any human being, and you should go into detention with the attitude that you are not playing at peak levels. There are some publications advocating not discussing sensitive topics with your captors. This is the worst advice on the planet. Your goal during detention is to get your captors to see you as a human being. We only engage in conversations with other human beings so sub-consciously if your captors are engaging in a conversation with you, they are treating you like a fellow human being.

Talk with your captors about anything they are willing to discuss with you. You should try to make reasonable requests of your captors. Reasonable under most circumstances will consist of water, shelter, food and potentially use of a bathroom. Anything beyond that you should at least initially put on the unreasonable list. In doing so, make a sincere effort to understand your attackers plight. No one is born a terrorist or a violent criminal. They are made that way by the circumstances under which they were raised. They do not see their future they way you do, and if you make a sincere effort to empathize with them, they may well empathize with you to some degree.
Your goal is to learn as much about your captors as possible. Family, friends, pass times and thoughts on the universe. The more the better! First it will help to keep your mind active and engaged, and second it may help with prosecution later. Stockholm syndrome is a debatable condition under which prisoners empathize with their captors to the point of assisting them and supporting their cause. If you approach developing a relationship from the standpoint of trying to get Stockholm syndrome, you are on the right track. A psychiatrist can fix that problem when you get back alive and unharmed. Be a good student of your captor’s beliefs.

 The exploitation phase of a kidnapping:

You will most likely be exploited during you captivity. This may consist of getting money from a bank or ATM, making videos or being photographed with magazines, or newspapers to establish proof of life. You may be forced to do interviews or write letters that may seem incongruent to your personal beliefs. While you do not want to be seen as weak or pathetic by giving in, ultimately anyone can be broken. Use this as an opportunity to cause your attackers to explain things to you by feigning confusion and ignorance – and remember, you are not at the top of your game, and confusion and ignorance is probably a reality.

While it may not seem like it at the time, exploitation is a positive sign. These items are likely to be seen by others or they would not be produced. While they are probably being used to negotiate a higher price for your release, your eventual release is the goal and this is part of the process of getting there.

The release phase of kidnapping:


Frequently, victims are simply dropped off in a semi-populated area. It is likely an area where the kidnappers have some freedom of movement. Do not assume that strangers will not take advantage of your weakened condition. Hospitals, medics, police or military personnel are your best bet. If none are nearby, larger crowds are more likely to result in someone doing the right thing and reporting you to one of the above. While unlikely, you do not want to put yourself at additional risk by surviving your ordeal, and being kidnapped or killed by a competing gang in the same town!

Kidnapping is a growing threat in many places around the world. Take an active interest in your own safety and security and check the facts before you travel. Don’t ignore the risks or assume “This will never happen to me”. If you take even minor precautionary steps, you massively lower your risk, because unfortunately, most people walk around oblivious to the threat. If you and a group of friends are chased by a bear in the woods, you don’t have to be the fastest person in the group, you just can’t be the slowest. The same applies to kidnapping. Of all the people in the area that meet a kidnappers profile, you just can’t be the easiest one to attack!

Have fun and come home safe!

About Author


- Patrick Henry


President

Patrick HenryPatrick Henry received his operational training and experience from the U. S. Government, 22 years of which were spent in the Marine Corps where he served in the Reconnaissance, Infantry and Intelligence fields. During his active service, he spent more then seven years deployed overseas in combat, operational and training assignments. After the military, Pat worked as a contractor and as the Director of Operations at a private paramilitary company, specializing in training special operations forces and providing protective services to select private clients. His education consists of an MBA from the University of Southern California (USC), and a BS from San Diego State University with an emphasis in Biochemistry, Cell and Molecular Biology and a minor in Psychology. He holds an extensive list of security and training related certifications from a variety of government and nationally recognized entities. He currently sits on the advisory committee at USC’s Master of Veterans Business Program, and is an active member of Infraguard and the American Society of Industrial Security (ASIS). He has been a guest speaker at ASIS, the San Diego Industrial Security Awareness Council and other private organizations on physical security, travel security, and competitive intelligence collection counter-measures.
Tuesday, April 8, 2014

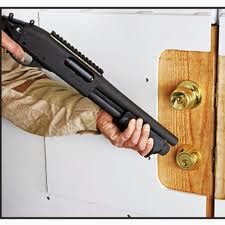
Shotgun Breaching 101

Shotgun Breaching
Members and readers, if you have noticed a trend toward more tactical shotgun articles lately, you are correct. We have discussed at length the ability to use the Shotgun as a weapon and the ability to add accessories such as lights and extra ammunition quite easily. For a relatively inexpensive weapon, it has great versatility and firepower. For close quarter type engagements, the sheer kinetic energy it delivers without most of the over-penetration problems found with many other weapons, makes it THE Weapon of choice for home defense. As we move to the use of the shotgun as a ballistic tool, it becomes even more apparent that having a properly equipped shotgun at your home makes you and your family safer and more prepared for any and all eventualities. Now, we will discuss the importance of knowing how to use shotgun breaching techniques that can be useful in emergency situations.

The idea of using a shotgun as a breaching tool goes back to the early days of the specialized military units that excel at hostage rescue. These units quickly realized that getting into secured areas quickly was a huge plus in the total tactical picture. Although many specialized devices have been designed to open locked doors, windows and re-enforced barricades, the ballistic energy of a shotgun with the proper ammunition is one the quickest and safest ways to get through a closed and locked obstacle. So how do you apply this knowledge to getting you and your family out of a potentially dangerous situation?

Easy, the same ballistic tool that is used to get specialized ‘door kicker’ units into a hardened target area can get you and your family out of a burning house or other structure. The ballistic breaching capability of a 12 gauge shotgun with good old fashioned ‘00’ buckshot is outstanding. What do you have planned if the fire in your home is between you and the door to the outside and the other exterior doors are locked? Go try to find the keys in the smoke? Try to kick the door open just like they do in the movies? Won’t work on an inward opening door. By following some simple safety procedures, you can get your family through a locked door in less than 30 seconds. The key is to have enough ammunition to ballistically breach the locking mechanism in the door, deadbolt and door handle catch, or just shoot the hinge area and not injure your people in the process.

By locating the hinges with your tactical light and placing the muzzle of the shotgun at a 45 degree angle into the door/door jam, the buckshot will cut though the wood and displace the small wood screws that hold the hinges in place. Two rounds of buckshot into the hinge area, one on top and one at the bottom, will dislodge both the screws and the wood that supports it. If, for some reason the hinge area is still intact, just shoot it again. You should have plenty of extra ammo either in the extended magazine tube or an auxiliary source. Some of the newer tactical shotguns come with a muzzle break that has sharp 45 degree edges that will hold the weapon in place while you shoot into the door/door jam. This device also allows the gas to escape while shooting, preventing you from damaging your weapon.

Shotgun Breaching
Because you are using buckshot instead of the specialized ammunition that military and law enforcement use, ensure you are shooting into the door or the door jam where the wood screws are attached, not directly at the exposed hinge. This will limit the amount of ricochet and fragmentation of the soft lead pellets impacting on the metal hinge. Ensure your other family members are a safe distance from the area while you’re engaging the hinge area, eye protection would be nice, but it is very doubtful you will have clear shooting glasses on during this emergency. Just simply place the muzzle on the desired breach point, place the weapon on fire and look away from the door while firing the shotgun, run the action to reload the shotgun and, after shooting the top part of the hinge area, move the weapon to the bottom part of the hinge area and repeat the process. For those of you not familiar with residential construction, there are some simple guidelines to follow, if the barrel of the hinge is on the inside of the door jam, the door opens inward. If you cannot see the hinges, the door opens outward.

Most doors have three sets of hinges located approximately 6 to 10 inches from the top and bottom of the door with the third hinge in the middle. It is also important to realize that an inward opening door will still need to be moved inward out of the door jam, even after the hinges have been dislodged. The easiest and quickest way to do this procedure is to use a crowbar or a sturdy fixed blade knife to pry the door inward and out of the doorframe. Again, ensure your other family members are positioned well away from the doorframe and ready to move through the opening after you have pried it open and removed it. The door will probably fall after it is removed from the support structure. You should also inspect the door frame area for large splinters and the immediate outside area for more potential hazards before any of your family members exit through your improvised exit point. By positioning yourself to one side of your exit point, you can do your quick inspection of the area, illuminate the exit point for your family by pointing the light straight down and get a full head count as they exit the structure moving to a safer area well away from the fire inside. This is exactly how special military and law enforcement units extract people from a dangerous situation or structure.

Yes it will be loud, earplugs are always handy, but you have few options and even less time if the fire is raging inside the home or structure. As you can see from the above paragraph, having a tactical light on your shotgun makes this entire process much easier and safer. Just having a tactical light during this emergency will help you immensely, it can be used along the floor to illuminate the way to the exit for others and have a light source and a signaling device once outside into a potentially dangerous environment. If you have one of the newer model lights with a two position thumb switch, you can use the low power setting for inside the house or structure and the high power setting for signaling outside. By having the use of two hundred plus lumens at your disposal, you can signal police, firefighters, first responders, even helicopters to your location and potentially illuminate your path to a much safer more tactically sound position.

First Published at Aegis Academy

About Author


- Chris White


Range Master


Chris White, Firearms Instructor Chris White is 20-year veteran of the United States Navy (SEAL Teams) where he retired as a Chief (SO7). He has multiple combat tours and was assigned to three different SEAL teams as well as Naval Special Warfare Development Group during his active duty service. His key billets include: Assault Team leader, Platoon Chief and Platoon LPO at Development Group. He spent 6 years in instructor and training assignments during his career. Since his retirement, he has worked as an instructor and contracted operator at numerous high threat security providers in the Middle East and Africa. He continues to deploy in support of contingency operations and high threat protective details spending approximately 120 days a year overseas. He holds an extensive list of Department of Defense and Special Operations Command certifications and qualifications.