Thursday, March 19, 2015

Obtaining a Concealed Carry Weapon Permit in Orange County

I decided to write this article to try and provide some insight into the Conceal Carry Weapon (CCW) permit process. This article is Part 1 on a series of articles I will be writing related to CCW. Please check back with us so you can read the complete series.

Ca Gun Control Patrick Henry Gun laws
I have come across many people who have not even tried to obtain a California CCW out of fear of being denied. Fortunately and possibly due in part to some recent court decisions, obtaining a CCW firearms permit has become much easier.

For the most part, the process will look very similar no matter where in California you might live. Being that I am an Orange County approved CCW instructor, I will write about obtaining a concealed carry weapon permit in Orange County.

Orange County CCW Process

You will first want to contact the sheriff’s department in the county you reside in. Most city police agencies have an understanding with the sheriff's department that they will defer CCW applicants to the sheriff’s department for processing.

Once you are in contact with a sheriff’s department representative, request an initial interview. Depending on your jurisdiction, you may be able to do this through the department’s website. Essentially, you provide your name and email and within a few days you should receive a response to your email, which will include your appointment date, time and location. Now, don't let the email scare you. It will probably tell you that your appointment date is six to twelve months away, but you have to start the process sometime!

Orange County
Fortunately, there is good news. What typically happens as your interview date draws nearer is you receive an additional email telling you that an earlier date is available, and asking you if you want that appointment instead. This can shorten your wait time by months at a time. Be sure to keep track of the initial email despite anticipating a second email: the initial email will also have an attached CCW application and checklist.

Preparing for the interview

Be prepared! Make sure you have brought in everything that was requested by the sheriff’s department including a completed application, proof of residency, a driver’s license or some form of government identification such as a passport, a birth certificate, and a recently taken passport quality photo. There will be a checklist; be sure you have brought in all the items on the list in order to expedite the process. You may want to consider dressing professionally, it can only help you.
Gun-Workplace
Meeting with the investigator for your interview may sound intimidating, but in most cases it is a very easy, relaxed process. The investigator will go over your completed application with you. Depending upon your background he or she may ask you to clarify a few things. Be truthful about everything. At the conclusion of the interview, which will take probably less than 20 minutes, the investigator will have you sign your application in their presence under penalty of perjury. Remember what I said about being truthful!

In all my dealings with these law enforcement professionals I have always found them to be very easy to deal with. I am sure you will leave there feeling like that was a lot easier than you thought it would be.

Residency Check:

In Orange County you can expect that a uniformed deputy will be knocking on your door within the first week of submitting your application. The sheriff’s department must verify that you live in the county and at the address you provided. If you are not home they will knock on your neighbors’ doors to see if anyone can verify that you live at the address you provided. The deputies will not discuss with the neighbors the reason for the request, so it may leave your neighbors a little curious.

policework
Once the residency check is completed and verified you move to the next step, which is rather informal. An initial background check will be done on you and your file is sent up the chain of command for initial approval. A supervisor will look over your file to make sure nothing is missing. If there is nothing out of the ordinary you will move forward to the next step.

Initial Approval:

About 4-6 weeks after your initial interview you may receive an initial approval email. The email will state that you have been initially approved to move forward in the process. The email will include instructions on completing your live scan and on completing your CCW training course. Be sure to complete the live scan as soon as possible because it can take 4-8 weeks for your background to be conducted and cleared. Next, select an instructor (look for an upcoming article on how to select an instructor) from the approved list, complete your initial CCW training course, and obtain your certificate.  Send a copy of your course certificate to the sheriff’s department CCW unit either through email or fax.

Final Approval:

Once you have completed all of the above there is nothing more to do except wait for your background to be completed. If you are approved by the department you will receive a final approval email. The email will have a date for you to return to the sheriff’s department to sign the terms and conditions and pick up your new permit.

In Closing:

Training and education
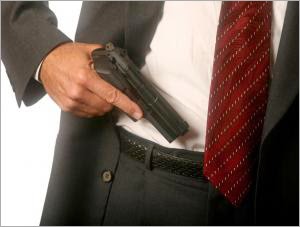
Carrying a concealed firearm is a big responsibility. Negligent discharges are important reminders of how serious this responsibility should be taken. Negligent discharges can occur for a variety of reasons, but it is usually the fault of the person holding the gun. Many people who first obtain their CCW become over confident in their skill set. Just because you have been approved to carry a loaded gun doesn’t mean you have developed the necessary skills to do so! Most of the negligent discharges that I have witnessed occurred when the shooter was either drawing or holstering their firearm. It is in your responsibility to practice on a regular basis. I would suggest you continue your training and education by enrolling in further firearms training to supplement your CCW course. Lastly, always store your firearm in a lawful manner; and always adhere to the terms and conditions of your permit.

I hope you have found this article helpful. If you have questions feel free to contact me directly via email.

Author: Jason Granados (Firearms Instructor)

Jason Granados is a law enforcement veteran with more than 10 years experience. His duties and responsibilities were as follows. He spent more than five years assigned to the departments special tactics unit. During his time in this unit he was a supervisor in the unit as well as the team leader. He also served as the departments firearms instructor where he taught pistol, shotgun and carbine. During this time he was responsible for maintaining the departments qualification standards. Jason has also testified in State Superior Court as a firearms expert. Jason also has more than 10 years experience in martial arts and is a black belt in Brazilian Jiu Jitsu. Jason continues to compete in Martial Arts competitions and is currently ranked #5 in the world by the International Brazilian Jiu Jitsu Federation.

Source: http://aegisacademy.com/community/obtaining-a-concealed-carry-weapon-permit-in-orange-county/

Tuesday, March 10, 2015

Diagnosing Pistol Malfunctions – Part 3: Failure to Eject

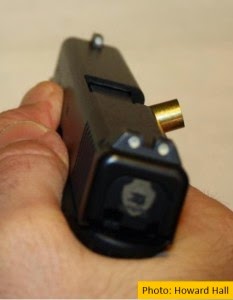
Stove-Pipe-IIWelcome back and thank you for returning to read the final installment in the Diagnosing Pistol Malfunctions series. To cover the wide range of topics in this series, I have broken the 8 elements of the cycle of operation into the three commonly accepted types of pistol malfunction. Part 1, Failure to Feed, covered the first three elements: feeding, chambering, and locking. Part 2, Failure to Fire, covered the fourth and fifth elements: firing and unlocking. In Part 3, Failure to Eject, we will discuss the remaining three elements within the cycle of operation: extracting, ejecting, and cocking. Within this category of stoppages, I will analyze the three main causes: (1) failure to extract; (2) double feed; and (3) stove pipe.
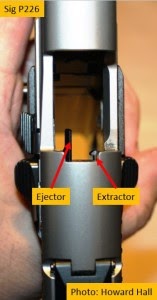
As we begin this discussion, I believe it is important to once again emphasize the preeminent role of the extractor and highlight its counterpoise with the ejector. In both Part 1 and Part 2 of the series, I described the extractor’s role in properly guiding a cartridge case along the breech face during the feeding cycle as well as its role in firmly holding the cartridge in place centering the primer in front of the firing pin hole.

Extractor and EjectorIn Part 3, we will discuss the extractor’s profound role as the extractor claw “grips” the cartridge rim as the firearm unlocks and the rearward movement of the slide “extracts” the spent cartridge case from the chamber. As the slide continues its full rearward movement, the extractor maintains proper tension on the cartridge case holding it in position against the breech face until the continued rearward motion thrusts the base of the cartridge case against the ejector. Working in unison, the extractor continues to pull as the ejector pushes the spent cartridge case through the ejection port and away from the pistol… just in time for the slide to begin its forward motion which will feed the next round.
Failure to Extract

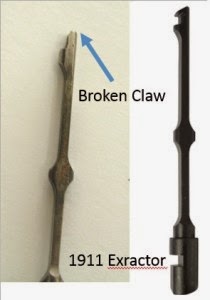
A failure to extract occurs when the cycle of operation is interrupted by a cartridge case that becomes stuck in the chamber. Even with a dirty chamber or a corroded cartridge case, the extractor tension combined with rapid slide movement create enough force to pull the case from the chamber. Therefore, the most likely cause of a failure to extract is either a broken extractor or one with improper tension.

Compares two 1911 extractors A brief visual inspection of the extractor claw can indicate excessive wear, damage, or a clean break. The photo to the right compares two 1911 extractors. One clearly has a broken claw. The only remedy to this problem is a full replacement. The good news is that most manufacturers produce quality extractors that are very affordable. They can range from $15.00 to $45.00 depending on the "name brand" you go with. Wilson Combat 1911 extractors are in the mid-$30.00 range and Glock extractors are just under $20.00. Since these are such an important item, it is a good idea to keep a spare extractor or two in your range bag.
When designed internal to the slide, such as most 1911s, the extractor is typically a solid piece of steel with a claw protruding into the breech. A "bow" in this solid piece of steel provides tension to the cartridge case. As such, the internal extractor itself can be considered a spring. The degree of the "bow" determines how much or how little tension is applied to the cartridge case.

When designed external to the slide, such as Glocks and Sigs, the extractor is one or more pieces of metal also with a claw protruding into the breech. External extractors rely on leverage and a spring to provide proper tension.
Whether internal or external, too much extractor tension may cause a failure to feed, but too little extractor tension could cause both a failure to feed and a failure to extract. In the case of a failure to extract, there just isn’t enough tension at the extractor claw to pull the case from the chamber. A visual inspection may not allow you to ascertain proper extractor tension.

If you recall from previous discussions, proper extractor tension can be determined by removing the slide from your pistol and pushing a loaded cartridge case against the breech face with the case rim under the extractor claw. Once in place, shake the slide in your hand. The cartridge should remain in place. If it falls free, there may be insufficient extractor tension.

If you determine you have insufficient extractor tension, I recommend conducting a detailed disassembly and cleaning of your slide. Built-up dirt may be limiting the movement of your extractor and its parts. If cleaning the extractor, channel, and springs does not correct the problem, then you may need to modify or change some parts. If you have a one-piece internal extractor, you can "bend" it a little further inward to
increase the "bow," and thus the tension. If you have an external extractor, you may need to replace the springs.

Double Feed

A double feed is one of the most difficult stoppages to clear… especially under pressure. "Tap… Rack… Assess" will either fail to correct the problem or create yet another double feed. It requires you to lock the slide to the rear, remove the magazine, “rack” the slide repeatedly to remove any cartridges, reinsert the magazine, and then chamber another round.

But what causes it? Read More »

About Author: Howard Hall (Range Master)

Howard has served for nearly 20 years in the Marine Corps. He has served as a Platoon Commander, Company Commander, Battalion Executive Officer, Regimental Operations Officer, and Battalion Commander. He has multiple combat tours to include serving as a military transition team member in Fallujah. He is an NRA Certified handgun instructor and holds numerous Marine Corps training credentials.

An active competitor in action pistol (United States Practical Shooting Association), long range rifle (NRA F-Class), and shotgun (Amateur Trapshooting Association, National Skeet Shooting Association), howard has earned numerous accolades and medaled during DoD competitions with the 1911 platform in bulls-eye shooting.

Thursday, March 5, 2015

Gun Review EAA Windicator .38 Special/.357 Magnum Revolver


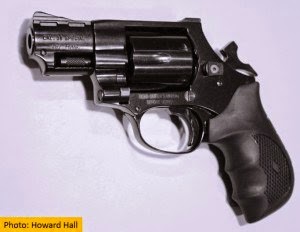
EAA Windicator .38 Special/.357 Magnum Revolver
In regard to the third “F” in Fit, Function, and Finances… does a quality gun necessarily have to be expensive? We’ll take a look at that question in this review of the EAA Windicator .38 Special/.357 Magnum Revolver.
Aside from the firearms I’ve used in conjunction with my military career, I’ve spent my “other” shooting career focused on firearms for competition, sporting, and personal defense. As such, I’ve spent only a fraction of that time shooting revolvers. I have noted, however, that a growing number of clients are interested in learning about revolvers for per395087sonal defense. snake-shot,
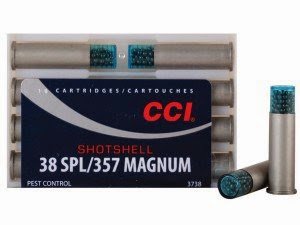
ShotShell 37SPL/357 Magnum
which cannot be fired through semi-automatic pistols. I must admit that I have also become increasingly interested in carrying a revolver for camping or while out at the cabin due to their durability, reliability, and wide variety of ammunition, which includes

I discussed this topic with one of my friends who works at Cabela’s in Hamburg, PA and mentioned that I was in the market for a rugged snub-nosed .38 special/.357 magnum revolver that could fit my large hand. He showed me a wide variety of revolvers from Ruger, Smith and Wesson, and Taurus that ranged from $450.00 to $900.00. Since I was only going to incorporate this revolver into basic firearms instruction and the occasional camping trip or weekend at the cabin, I challenged my friend to find one that met my specifications at or below $300.00. After a few minutes, he presented me with the EAA (European American Arms) Windicator, which is a 2 inch snub-nose blued revolver in .38/.357… for under $300.00!

Although it was a small 2 inch snub-nose, this revolver felt solid and the generous grip filled my large hand quite well. A cursory inspection verified that the lock-up and timing were acceptable. Dry-firing verified that the double action trigger pull was long and heavy compared to the short and light single action pull. Everything checked-out at the counter, but I wanted to do a little more research before committing to the purchase.

Over lunch, I looked-up everything I could find on the EAA Windicator. European American Arms (EAA), based in Florida, has been importing this revolver from a German company named Weihrauch for quite some time. The reviews spanned the gamut from “phenomenal” to “worthless.” A few reviewers cited their revolver losing its timing after firing thousands of high pressure .357 rounds or claiming that it was insufficient for IDPA shooting. Many reviewers cited that it was a great bargain for the price.

Since my expectations and intended usage were more in line with the price point than those who expressed disappointment in their reviews, I purchased the revolver, a few boxes of American Eagle .38 Special ammo, and set out to test it and form my own opinions. With the help of my friend, Al Rice, we put the Windicator through its paces at Sharpshooters in Lorton, VA.

By the Numbers


Six-shot single action / double action revolver
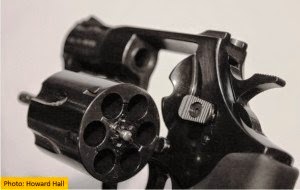
The EAA Windicator is a 2 inch snub-nosed six-shot single action / double action revolver chambered in .38 special and .357 magnum. Its fixed sights are comprised of a plain black ramp blade in the front and a plain “U” shaped fixed channel in the back. The overall length is 7 inches. This revolver has a substantial black rubber grip and weighs 30 ounces (nearly 2 pounds) empty! This is significant when you compare it to some of the popular snub-nosed .38/.357s like the Ruger LCR weighing-in at 17 ounces and the comparable Taurus and Smith and Wesson models weighing in at roughly 20 ounces (and with MSRPs from $500 to $700). The double action trigger pull exceeded the 10 pound limit on my spring-scale, but the single action pull registered a consistent 4 pounds across six tests.

Fit


As mentioned above, the Windicator’s grip was substantial enough to fill my hand, but was not so prohibitively large that a shooter with a smaller hand couldn’t establish a sufficient and comfortable grip. This revolver pointed naturally and the “length of pull” (distance from the back-strap to the trigger face) was appropriate for me to place the pad of my index finger where it belonged for a smooth trigger pull. From a double action start, the length of pull measured 2.525 inches and the sear broke at 2.105 inches, which means that 10+ pounds of steady pressure had to be applied throughout the trigger’s 0.420 inch travel. Conversely, cocking the hammer for a single action shot reduced the length of pull to 2.170, which leaves the shooter to apply 4 pounds of pressure over a very short 0.065 inch to break the shot.

Function


Again, I chose this revolver as a training aid for basic firearms instruction and as a utility firearm while camping or at the cabin. As such, the 2 inch snub nose makes it ideal for the classroom and the field. Also, while many new revolver designs for concealed carry are double-action-only “hammerless” (where the internal hammer has no exposed spur), I needed a DA/SA revolver with exposed hammer and spur for instruction and to provide the option of a heavy and deliberate double action or planned and light single action shot. Read More »

About Author: Howard Hall (Range Master)


Howard has served for nearly 20 years in the Marine Corps. He has served as a Platoon Commander, Company Commander, Battalion Executive Officer, Regimental Operations Officer, and Battalion Commander. He has multiple combat tours to include serving as a military transition team member in Fallujah. He is an NRA Certified handgun instructor and holds numerous Marine Corps training credentials.
An active competitor in action pistol (United States Practical Shooting Association), long range rifle (NRA F-Class), and shotgun (Amateur Trapshooting Association, National Skeet Shooting Association), howard has earned numerous accolades and medaled during DoD competitions with the 1911 platform in bulls-eye shooting.

Monday, February 23, 2015

Diagnosing Pistol Malfunctions – Part 2: Failure to Fire


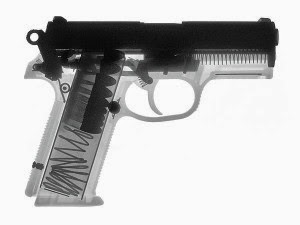
Hand gun x-ray print ray gun
Welcome back to our discussion on Diagnosing Pistol Malfunctions. In Part 2, we will cover an in-depth analysis of Failure to Fire.

Unfortunately, most of us have experienced this at one time or another. We’ve inserted a loaded magazine, released the slide, chambered a round, disengaged the safety, aligned the sights in the center of the target, slowly exhaled while pressing the trigger, and as we felt the sear release the hammer or striker we heard a “Click” instead of a “BANG!”

On the range, it may be an annoying inconvenience to wait 30 seconds with the pistol pointed in a safe direction before “tapping” the base of the magazine, “racking” the slide to eject a possibly bad round and chamber what we hope to be a “good” one, “assessing” the target area, and deciding whether or not to fire again. In a personal defense, law enforcement, or military scenario, however, the most deafening sound has been described as the “Click” instead of the “BANG” required to stop the threat.

In the previous article, we covered malfunctions that occur during the first three steps in the cycle of operation: Feeding, Chambering, and Locking. In this article, we will focus solely on malfunctions that occur in the “Firing” stage.

Assuming the pistol has successfully fed, chambered, and locked, there are only two types of malfunctions that would prevent the pistol from successfully firing. These can be isolated to either the ammunition or the pistol’s ignition system. First, let’s cover ammunition failures.

Ammunition Failure

If you recall from Internal Ballistics – Part III, we described pistol cartridge components: primer, case, propellant, and projectile. In order to focus this part of the discussion to ammunition, we need to assume that the pistol is mechanically functioning as intended and the cartridge is correctly chambered. Under these conditions, the ammunition failure must lie in the propellant or the primer.


SquibPropellant – If there is an insufficient quantity of propellant in the cartridge case, the primer/propellant ignition chain will not produce enough pressure to propel the projectile all of the way through the barrel. This is known as a “squib,” and the shooter should notice an audible “pop” instead of a “BANG” along with an under-powered recoil.
Propellant in the cartridge
Regardless, this is a failure in a number of ways. First, the projectile will not impact the target. Second, if the shooter does not correctly perceive the squib and errantly attempts to fire again with a projectile lodged in the barrel, the overpressure caused by the next round will damage the pistol and potentially injure the shooter. If you detect the audible “pop,” stop firing immediately.


Primer
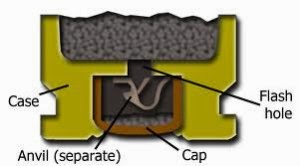
Primer – To briefly recap, the primer consists of a small metal cup that contains a pellet of sensitive explosive material secured by a paper disk and a brass anvil. A strike from the firing pin on the center of the cap compresses the primer composition between the cap and the anvil which causes the composition to ignite. Holes or vents in the anvil or closure cup allow the flame to pass through the flash hole in the cartridge case and ignite the propellant. The primer needs to be “tough” enough to withstand some jostling and extreme temperatures without igniting, but be malleable enough to fire when needed.

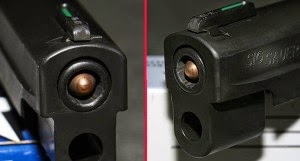
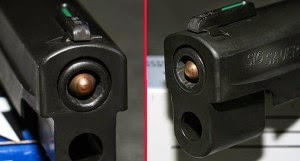
Again, in this section we’ve assumed that the cartridge is properly aligned on the breech face and the firing pin or striker has moved forward with enough force to ignite a normally functioning primer. However, there are some instances where the primer won’t function. First, the primer’s cap can be too thick or internal components can be incorrectly manufactured. Next, the primer can be set too low into the cartridge case and “out of range” of a normally functioning firing pin or striker. CartridgeLastly, an error in the cartridge manufacturing process can misalign, damage, or invert the primer. While all of the former defects would be difficult to ascertain, the latter can be diagnosed by visual inspection. (right inset photo)
Firearm Mechanical Failure


Turning things around, in this section we will assume that we have chambered a properly constructed cartridge, but a mechanical failure in the firearm itself is the cause of the malfunction. This leaves us to consider the following possibilities: (1) Something is preventing the firing pin or striker from moving forward with enough force to properly ignite the primer; (2) the firing pin is damaged; or (3) the firing pin or striker is moving forward properly, but the cartridge is misaligned Read More>>

About Author

Howard has served for nearly 20 years in the Marine Corps. He has served as a Platoon Commander, Company Commander, Battalion Executive Officer, Regimental Operations Officer, and Battalion Commander. He has multiple combat tours to include serving as a military transition team member in Fallujah. He is an NRA Certified handgun instructor and holds numerous Marine Corps training credentials.

An active competitor in action pistol (United States Practical Shooting Association), long range rifle (NRA F-Class), and shotgun (Amateur Trapshooting Association, National Skeet Shooting Association), howard has earned numerous accolades and medaled during DoD competitions with the 1911 platform in bulls-eye shooting.

Sunday, February 15, 2015

Pistol Magazines

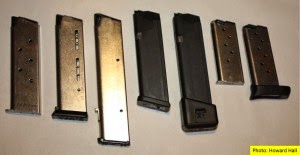
Magazine Lineup
This article focuses on one of the pistol’s most overlooked functional components… pistol magazines. In this article, I will cover a brief history of the magazine followed by a detailed description of magazine components and conclude with tips for magazine maintenance.

So why dedicate an entire article to pistol magazines? Well, two decades of competition shooting and on deployments around the globe have convinced me that the magazine is the leading cause of mechanical malfunctions in semi-automatic pistols (and rifles). Sure, there are other components like the extractor and ejector that vie for the top prize, but most would agree that the detachable box magazine is the clear winner. Furthermore, as a recreational shooter and firearms instructor, I've observed many gun owners reveling in their ability to clean and maintain their firearms while neglecting the magazines. If you are not yet convinced, here are two more reasons: (1) magazine maintenance is simple; and (2) a little effort can prevent a $40.00 part from turning a $1,000 pistol into a frustrating single-shot nightmare.

History


Borchardt_C93_with_magazine
The maturation of smokeless gunpowder through the latter half of the 1800's led designers such as Hiram Maxim to harness the recoil produced from firing self-contained cartridges to "auto load" the next round in his machine guns. Shortly thereafter, other firearm manufacturers sought to adopt this recoil-operated self-loading principle to pistols. In 1893, Hugo Borchardt designed the the C-93 (right inset) with an 8-round detachable box magazine, which became the first semi-auto pistol as we know it today.

Browning M-1900
Although Borchardt’s design was reliable, it was too large and unbalanced for mass acceptance. It didn’t take long, however, for other manufacturers to tweak and improve on the C-93, which led to the Mauser C-96 "Broom Handle," the German Luger Pistol, the Browning M-1900 (left inset), and… wait for it… the 1911.


1911_Navy_109967i
There have been plenty of innovations in semi-automatic pistol design and manufacturing over the course of time. The same can not be said, however, regarding innovations in semi-automatic pistol magazine design, which have changed little over the years.

Let’s take a closer look at pistol magazines.


Nomenclature

Although some of the materials have changed, most pistol magazines are comprised of the same components they have been for over 100 years.

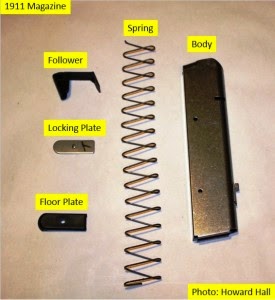
Magazine Part
Body/Tube - a metal or polymer shell in which the components reside and interact to both store and feed cartridges as part of the cycle of operations. The feed lips, located at the top of the magazine tube, hold the cartridges within the magazine and work with the follower to ensure proper alignment for feeding.

Spring - provides constant tension to the follower which holds the cartridges in position secure against the magazine feed lips and ready to be fed into the chamber.

Follower - metal or polymer fitting that: (1) captures the top end of the spring; (2) uses spring tension to hold the cartridges in position secure against the magazine feed lips; and (3) contacts the slide lock after the last round is fired. Metal followers are more rigid than polymer followers, but polymer followers contain a greater degree of inherent lubricity which enhances their ability to glide within the magazine tube.

Locking Plate and Floor Plate - function together to capture the spring from within the bottom of the magazine. Read More »

About Author

Howard has served for nearly 20 years in the Marine Corps. He has served as a Platoon Commander, Company Commander, Battalion Executive Officer, Regimental Operations Officer, and Battalion Commander. He has multiple combat tours to include serving as a military transition team member in Fallujah. He is an NRA Certified handgun instructor and holds numerous Marine Corps training credentials.

An active competitor in action pistol (United States Practical Shooting Association), long range rifle (NRA F-Class), and shotgun (Amateur Trapshooting Association, National Skeet Shooting Association), howard has earned numerous accolades and medaled during DoD competitions with the 1911 platform in bulls-eye shooting.

Thursday, February 12, 2015

Give the gift of Firearm safety Course this Valentines Day

Valentines Day is around the corner, if you have not yet purchased your gift, here is one unique gift idea your loved one may appreciate slightly more.

Forget about roses, give her the gift of self protection this Valentines Day. Your Valentine — whether she’s your wife, girlfriend, daughter or sister — deserves something very special. Being able to handle the bad situation where anyone try to harm or stop anyone forcefully entering the house is must when you are on any business trip or elsewhere. What could be more sentimental than a tool she can use to defend herself?

Aegis Academy Gift Certificate for Valentines Day

Purchase a gift card of “Firearm Safety and Familiarization Course” at Aegis Academy in San Diego. This is entry level course, designed for inexperienced shooters, the course will cover general firearm safety and range safety procedures and basic weapons handling course for variety of pistol, shotgun and carbine. Including lecture and all necessary access to our online library.

And the best part is you will get California Handgun Safety Certificate, a must have thing to own a gun in California.

The course is scheduled on February 15, 2015 12pm to 5:30pm – perfect timing. Let that special person in your life know how much you care about them and their well being.

After the range, go out to dinner together and talk about her shooting experience and of course, stay safe !!

Monday, February 9, 2015

Diagnosing Pistol Malfunctions – Part I: Failure to Feed

Failure to Feed
Whether on the range or via e-mail, I receive a lot of questions regarding pistol malfunctions. These questions go beyond discussing the skills required to clear malfunctions. They are geared more toward understanding “what” makes their pistol malfunction and what can be done to prevent the malfunction, rather than just relying on corrective actions alone. There is a lot of material to cover in regard to diagnosing pistol malfunctions, so I’ll break the topic into a three-article series. In general, there are three main types of malfunctions: (1) failure to feed; (2) failure to fire; and (3) failure to extract/eject. This first article: “Diagnosing Pistol Malfunction – Part I” will provide an in-depth discussion on failure to feed.

Cycle of Operations


I chose failure to feed since it is arguably the start of the cycle of operations. Internal Ballistics Part I listed detailed descriptions on each of the elements in the cycle of operation, which are: Feeding, Chambering, Locking, Firing, Unlocking, Extracting, Ejecting, and Cocking.


To be more specific on the definition of failure to feed, we will look closely at a semi-automatic pistol’s operation from the point of full slide recoil through the forward motion that strips the cartridge from the magazine, chambers the round, and locks into battery. This discussion will cover the majority of possible malfunctions or interruptions of the first three elements in the cycle of operations.


Slide Lock Malfunctions


Since we are starting this discussion from the point of full rearward slide movement, the first thing that can prevent the slide’s movement forward is an unanticipated slide lock engagement. Although it is easy to clear this malfunction, it is very frustrating and can cost precious seconds in a live engagement or competition.
 
When things are working properly, a small tab on the top left side of the magazine follower engages the portion of the slide lock protruding into the interior of the frame. As the last round is stripped from the magazine, the follower moves to the highest position in the magazine. Once that last round is fired and ejected, the follower pushes the slide lock protrusion and slide lock body up and into a small cut-out in the slide, thus locking it to the rear. Click the image below for a larger view.

When things aren’t working properly, the slide lock moves “up,” engages the slide while there are still cartridges in the magazine. Most pistols have an internal spring connected to the slide stop assembly which prevents inadvertent upward movement. 1911 style pistols have an external spring and plunger that provide friction against the face of the slide stop to prevent inadvertent engagement. If the malfunction is within the pistol, it may be due to a damaged or weak slide stop or plunger spring (1911). Otherwise, this can occur due to a magazine that is damaged or out of specification.

Slide lock


Most shooters don’t want to hear this, but the primary cause of premature slide-lock is shooter induced. I’ve heard shooters swear up and down that they are not the cause, only to find out that one of their thumbs “gently grazed” the slide stop and moved it upward during recoil.

If you are having this malfunction: (1) make sure it is not shooter induced; (2) check the magazines for proper contact with the slide stop; and (3) check the slide stop spring or the plunger spring in 1911s.

Cartridge Not Stripped From Magazine


This occurs when a round is fired, the case was extracted and ejected properly, but the next round is not stripped from the magazine leaving the slide to move forward and lock on an empty chamber. I’ve seen this a lot and it has happened to me on occasion during USPSA shooting.

Magazine improperly seated – Many of us have been there… we receive the command to “make ready,” so we insert a magazine, pull the slide to the rear and chamber a round, conduct a chamber check to ensure that a cartridge was chambered, apply the safety, holster, and wait for the signal to start firing. We hear the “beep,” unholster, index the first target, press the trigger, and send the first round down range. However, our second trigger press is met with a “click,” followed by any number of expletives. While we verified that the first cartridge was chambered, without ensuring that the magazine was fully seated, the slide simply “skipped over” the next cartridge instead of stripping it from the magazine and chambering it. A simple “tap” on the bottom of the magazine followed by racking the slide sets everything straight… most of the time.

Magazine Catch
In some cases, however, the problem is not shooter error, but is caused by the mechanical interaction within the pistol. There is a small cut-out in the magazine that contacts the internal surface of the magazine catch and locks the magazine in place within the frame. If the magazine is damaged in the vicinity of the cut-out, the magazine catch itself is damaged, or if there is dirt/debris blocking the magazine well, the magazine may not fully seat, which will cause the slide to “skip over” and completely miss the next cartridge in the magazine.

Chamber Feed Failure – Nose Down


This occurs when the tip of the cartridge impacts the feed ramp on the frame or barrel at a downward angle, fails to feed into the chamber, and halts the motion of the slide… thus jamming the pistol.

There are a number of potential causes for this type of malfunction which include the magazine, the extractor, the feed ramp, and the cartridge itself. Let’s start with a discussion on the magazines. Read More >>

Posted by Howard Hall